
Create Your Own Objects
It is easy to create your own objects and add them to a personal library as well.
- Go to Viewpoint ST-15.
- Zoom down on the quad-cube workstation set.
We can create this as a quad unit. It can then be exploded and divided if necessary. We will create the partitions first. This could be done as one piece but then it won’t explode properly.
- Select the Object-Rectangular-Flat command.
- Enter a Label of Partition 1.
- Enter Height of Sides as 5’.
- In the dialog change the Sides reflectance to 0.25 (dark gray).
- Click OK to exit dialog and draw the rectangular shape for the top partition (shown below).
- Change your cursor Snap to 0.05.
- Enable Ortho (F8).
- Draw the shape as shown below. You can enable the Snap-To command if you like (F3). If you do so, zoom close to be able to hit the correct corners. If you make a mistake use Ctrl-Z to move back one vertex.

Draw the right-most partition in the same way.
- Right-click to start the command again.
- Label the object Partition 2 (automatic label).
- The color and height should be present in the dialog from the previous command.
- Click OK to exit the dialog and draw the object.

Now draw the desktop.
- Select the Object-Polygon command again.
- Enter a Label of Desktop.
- Change the Height of Sides to 0.1’.
- Change the Walls (edges of table top) back to .5 reflectance.
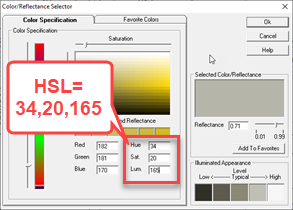
- Click in the color cell for the Top and change as shown below: HSL=34,20,165
- Click OK to exit the color dialog and then OK to exit the Object dialog.
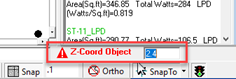
- Change the Z-height of the display to 2.4’ in the lower right corner of the screen before creating the shape (otherwise you will have to move it in elevation view). Just move the mouse over the cell and type!
- Turn off Ortho (F8).
- Draw the shape as shown below.
- Right-click to close the object (final side).

Now draw a simple block to serve as the file storage.
- Select the Object - Rectangular command.
- Enter a Label of Storage.
- Enter the Height as 2.4’.
- Change the color to anything you like. Ours is purple (HSL=177,95,74)
- Click OK to exit and draw the rectangle.
- Enter three points to create the shape.

Mirror the objects to complete the workstation. This will take two mirror operations.
- Select the Object – Mirror – Window option.
- Window across the vertical partition, tabletop and file storage as shown below (crossing window). Do not select the horizontal partition below.
- Now enter two points (2 clicks) for the mirror line as shown. You may want to disable Snap-To (F3).

This operation mirrors the upper right corner to lower right corner including vertical partition. One more time to mirror necessary content from right to left.
- Right click to activate the Object Mirror-Window command again (watch the command line).
- Window across the objects on right side, including the horizontal partition. Do not include the vertical partitions (shown below).
- Now zoom down and create the mirror line vertically as shown.

This step completes the quad workstation assembly. We could simply copy it (or pieces of it) around our model as is now, but it could be useful on other projects so let’s save it in the library.
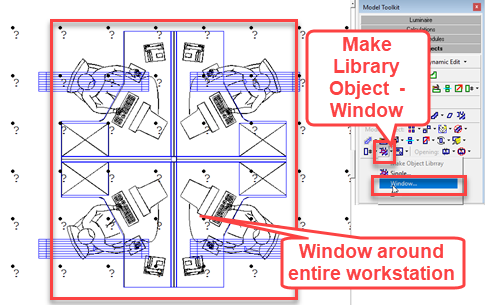
- Select the Make Library Object command, Window option, from the Rooms/Objects toolkit.
- Window around the new workstation (all four).
- Enter the Insertion Point for the new object. This is best as the center point of the quad.
In the subsequent dialog you have the option of storing the new object in the default user library titled “_UserLibrary”, or you can create a new library of your own by clicking the New button. You can have any number of your own libraries. For this lesson we will simply use the default response.
- Enter a Label for the object.
- Click OK to advance.

The next dialog (below) opens allowing the new object to be placed in the current model. If you did not want to use it when you create it, you can simply Cancel this operation. The new object is available anytime in the library.

- Click OK to place an instance in the model next to the original in Viewpoint ST-12.
- The original has automatically been replaced with the new library object as well.
As we have shown it is easy to spruce up your models to lend some human perspective. While you could add every piece of furniture in the model it is worth keeping the real objectives in mind: the purpose of AGi32 is lighting calculations. Visualizations are valuable for confirmation of accuracy (placing geometry), evaluation of results and presentation.
Let’s render our current model.
- Go to Render mode.
- Click Calculate.

Nice work!
 RESCUE
Open the completed file: RESCUE-Intermed_Interior-8.AGI
